# 十二、编辑用户资料

# 1、创建组件并配置路由
1、创建 views/user-profile/index.vue
<template>
  <div class='user-profile'>
     用户资料编辑页码
  </div>
</template>

<script>
  export default {
    name: "UserProfile"
  }
</script>
<style lang='less' scoped>
</style>
2
3
4
5
6
7
8
9
10
11
12
13
2、将该页面配置到根路由
{
  path: '/user/profile',
  name: 'user-profile',
  component: () => import('@/views/user-profile')
}
2
3
4
5
3、my/index.vue 给编辑资料按钮绑定跳转
 <van-button
    size="mini"
    round
    to="/user/profile"
>编辑资料</van-button>
2
3
4
5
# 2、页面布局
<template>
  <div class="user-profile">
    <!-- 导航栏 -->
    <van-nav-bar
      class="page-nav-bar"
      title="个人信息"
      left-arrow
      @click-left="$router.back()"
    />
    <!-- /导航栏 -->

    <!-- 个人信息 -->
    <van-cell class="avatar-cell" title="头像" is-link center>
      <van-image
        class="avatar"
        round
        fit="cover"
        src="https://img.yzcdn.cn/vant/cat.jpeg"
      />
    </van-cell>
    <van-cell title="昵称" value="内容" is-link />
    <van-cell title="性别" value="内容" is-link />
    <van-cell title="生日" value="内容" is-link />
    <!-- /个人信息 -->
  </div>
</template>

<script>
export default {
  name: 'UserProfile',
  components: {},
  props: {},
  data () {
    return {}
  },
  computed: {},
  watch: {},
  created () {},
  mounted () {},
  methods: {}
}
</script>

<style scoped lang="less">
.user-profile {
  .avatar-cell {
    .van-cell__value {
      display: flex;
      flex-direction: row-reverse;
    }
    .avatar {
      width: 60px;
      height: 60px;
    }
  }
  .van-popup{
      background-color:#f5f7f9;
  }
}
</style>
2
3
4
5
6
7
8
9
10
11
12
13
14
15
16
17
18
19
20
21
22
23
24
25
26
27
28
29
30
31
32
33
34
35
36
37
38
39
40
41
42
43
44
45
46
47
48
49
50
51
52
53
54
55
56
57
58
59
60
61
# 3、展示用户信息
思路:
- 找到数据接口
- 封装请求方法
- 请求获取数据
- 模板绑定
1、在 api/user.js 中添加封装数据接口
/**
 * 获取当前登录用户的个人资料
 */
export const getUserProfile = target => {
  return request({
    method: 'GET',
    url: '/v1_0/user/profile'
  })
}
2
3
4
5
6
7
8
9
2、在 views/user-profile/index.vue 组件中请求获取数据
<script>
import { getUserProfile } from '@/api/user'

export default {
  name: 'UserProfile',
  components: {
  },
  props: {},
  data () {
    return {
      user: {} // 个人信息
    }
  },
  computed: {},
  watch: {},
  created () {
    this.loadUserProfile()
  },
  mounted () {},
  methods: {
    async loadUserProfile () {
      try {
        const { data } = await getUserProfile()
        this.user = data.data
      } catch (err) {
        this.$toast('数据获取失败')
      }
    }
  }
}
</script>
2
3
4
5
6
7
8
9
10
11
12
13
14
15
16
17
18
19
20
21
22
23
24
25
26
27
28
29
30
31
3、模板绑定
<!-- 个人信息 -->
<van-cell
          class="photo-cell"
          title="头像"
          is-link
          center
          >
    <van-image
               class="avatar"
               fit="cover"
               round
               :src="user.photo"
               />
</van-cell>
<van-cell
          title="昵称"
          :value="user.name"
          is-link
          />
<van-cell
          title="性别"
          :value="user.gender === 0 ? '男' : '女'"
          is-link
          />
<van-cell
          title="生日"
          :value="user.birthday"
          is-link
          />
<!-- 个人信息 -->
2
3
4
5
6
7
8
9
10
11
12
13
14
15
16
17
18
19
20
21
22
23
24
25
26
27
28
29
30
# 4、修改昵称
# 4.1、准备弹出层
定义弹出层控制变量
  data () {
    return {
      // 其他变量...
      isUpdateNameShow: false
    }
  },
1
2
3
4
5
6绘制弹出层组件
 <!-- 编辑昵称 -->
<van-popup
    v-model="isUpdateNameShow"
    style="height: 100%;"
    position="bottom"
>
    昵称编辑修改
</van-popup>
<!-- /编辑昵称 -->
1
2
3
4
5
6
7
8
9打开弹出层
<van-cell
    title="昵称"
    :value="user.name"
    is-link
    @click="isUpdateNameShow = true"
/>
1
2
3
4
5
6
# 4.2、封装组件和布局
创建
user-profile/components/update-name.vue组件<template> <div class="update-name"> <!-- 导航栏 --> <van-nav-bar title="设置昵称" left-text="取消" right-text="完成" @click-left="$emit('close')" /> <!-- /导航栏 --> <!-- 输入框 --> <div class="field-wrap"> <van-field v-model.trim="message" rows="2" autosize type="textarea" maxlength="7" placeholder="请输入昵称" show-word-limit /> </div> <!-- /输入框 --> </div> </template> <script> export default { name: 'UpdateName', components: {}, props: {}, data () { return { message:'' } }, computed: {}, watch: {}, created () {}, mounted () {}, methods: { } } </script> <style scoped lang="less"> .field-wrap { padding: 20px; } </style>1
2
3
4
5
6
7
8
9
10
11
12
13
14
15
16
17
18
19
20
21
22
23
24
25
26
27
28
29
30
31
32
33
34
35
36
37
38
39
40
41
42
43
44
45
46
47
48
49
50
51
52父组件
user-profile/index.vue导入,注册,使用 且监听关闭事件import UpdateName from './components/update-name'1components: { UpdateName }1
2
3<!-- 编辑昵称 --> <van-popup v-model="isUpdateNameShow" style="height: 100%;" position="bottom" > <update-name @close="isUpdateNameShow = false" /> </van-popup> <!-- /编辑昵称 -->1
2
3
4
5
6
7
8
9
10
11
# 4.3、数据传递
父组件 传递用户昵称用于显示,且将来子组件内部会更新这个昵称,故而可使用
v-model<!-- 编辑昵称 --> <van-popup v-model="isUpdateNameShow" style="height: 100%;" position="bottom" > <update-name v-if="isUpdateNameShow" v-model="user.name" @close="isUpdateNameShow = false" /> </van-popup> <!-- /编辑昵称 -->1
2
3
4
5
6
7
8
9
10
11
12
13子组件定义
props接收props: { // 接收用户昵称 value: { type: String, required: true } }1
2
3
4
5
6
7将接收到的数据赋给
data变量(如果直接绑定给输入框则违法了修改props的原则)data () { return { message: this.value } },1
2
3
4
5
# 4.4、发送请求
在
api/user.js里面封装修改资料方法/** * 更新用户资料 */ export const updateUserProfile = data => { return request({ method: 'PATCH', url: '/v1_0/user/profile', data }) }1
2
3
4
5
6
7
8
9
10
11确定按钮绑定事件
<!-- 导航栏 -->
<van-nav-bar
 title="设置昵称"
 left-text="取消"
 right-text="完成"
 @click-left="$emit('close')"
 @click-right="onConfirm"
/>
1
2
3
4
5
6
7
8导入请求方法,发送请求
import { updateUserProfile } from '@/api/user'1async onConfirm () { this.$toast.loading({ message: '保存中...', forbidClick: true, // 禁止背景点击 duration: 0 // 持续展示 }) try { const message = this.message if (!message.length) { this.$toast('昵称不能为空') return } await updateUserProfile({ name: message }) // 更新视图 this.$emit('input', message) // 关闭弹层 this.$emit('close') // 提示成功 this.$toast.success('更新成功') } catch (err) { this.$toast.fail('更新失败') } }1
2
3
4
5
6
7
8
9
10
11
12
13
14
15
16
17
18
19
20
21
22
23
24
25
26
27
28
29
30
# 5、修改性别
# 5.1、准备弹出层
定义弹出层控制变量
  data () {
    return {
      // 其他变量...
      isUpdateGenderShow: false
    }
  },
1
2
3
4
5
6绘制弹出层组件
 <!-- 编辑性别 -->
<van-popup
    v-model="isUpdateGenderShow"
    position="bottom"
>
    编辑性别
</van-popup>
<!-- /编辑昵称 -->
1
2
3
4
5
6
7
8打开弹出层
    <van-cell
      title="性别"
      :value="user.gender === 0 ? '男' : '女'"
      is-link
      @click="isUpdateGenderShow = true"
    />
1
2
3
4
5
6
# 5.2、封装组件和布局
创建
user-profile/components/update-gender.vue组件<template> <div class="update-gender"> <van-picker show-toolbar title="标题" :columns="columns" :default-index="value" @cancel="$emit('close')" @confirm="onConfirm" @change="onPickerChange" /> </div> </template> <script> export default { name: 'UpdateGender', components: {}, props: {}, data () { return { columns: ['男', '女'], localGender:null // 当前性别 } }, computed: {}, watch: {}, created () {}, mounted () {}, methods: { // 确定事件 onConfirm(){ }, // 选择器发生变化的时候 onPickerChange (picker, value, index) { this.localGender = index } } } </script> <style scoped lang="less"> </style>1
2
3
4
5
6
7
8
9
10
11
12
13
14
15
16
17
18
19
20
21
22
23
24
25
26
27
28
29
30
31
32
33
34
35
36
37
38
39
40
41
42
43
44
45父组件
user-profile/index.vue导入,注册,使用 且监听关闭事件import UpdateGender from './components/update-gender'1components: { UpdateGender }1
2
3<!-- 编辑性别 --> <van-popup v-model="isUpdateGenderShow" position="bottom" > <update-gender @close="isUpdateGenderShow = false" /> </van-popup> <!-- /编辑性别 -->1
2
3
4
5
6
7
8
9
10
# 5.3、数据传递
父组件 传递用户昵称用于显示,且将来子组件内部会更新这个性别,故而可使用
v-model<!-- 编辑性别 --> <van-popup v-model="isUpdateGenderShow" position="bottom" > <update-gender v-if="isUpdateGenderShow" v-model="user.gender" @close="isUpdateGenderShow = false" /> </van-popup> <!-- /编辑性别 -->1
2
3
4
5
6
7
8
9
10
11
12子组件定义
props接收props: { // 接收用户性别 value: { type: Number, required: true } }1
2
3
4
5
6
7将接收到的数据赋给
data变量(如果直接绑定给输入框则违法了修改props的原则)data () { return { columns: ['男', '女'], localGender: this.value } },1
2
3
4
5
6
# 5.4、发送请求
在
api/user.js里面封装修改资料方法(相同不用封装)/** * 更新用户资料 */ export const updateUserProfile = data => { return request({ method: 'PATCH', url: '/v1_0/user/profile', data }) }1
2
3
4
5
6
7
8
9
10
11导入请求方法,发送请求
import { updateUserProfile } from '@/api/user'1async onConfirm () { this.$toast.loading({ message: '保存中...', forbidClick: true, // 禁止背景点击 duration: 0 // 持续展示 }) try { const localGender = this.localGender await updateUserProfile({ gender: localGender }) // 更新视图 this.$emit('input', localGender) // 关闭弹层 this.$emit('close') // 提示成功 this.$toast.success('更新成功') } catch (err) { this.$toast.fail('更新失败') } }1
2
3
4
5
6
7
8
9
10
11
12
13
14
15
16
17
18
19
20
21
22
23
24
25
26
WARNING
目前性别修改后台接口存在问题,无论如何修改,性别依然是女
# 6、修改生日
# 6.1、准备弹出层
定义弹出层控制变量
  data () {
    return {
      // 其他变量...
      isUpdateBirthdayShow: false
    }
  },
1
2
3
4
5
6绘制弹出层组件
 <!-- 编辑生日 -->
<van-popup
    v-model="isUpdateBirthdayShow"
    position="bottom"
>
    编辑生日
</van-popup>
<!-- /编辑生日 -->
1
2
3
4
5
6
7
8打开弹出层
    <van-cell
      title="生日"
      :value="user.birthday"
      is-link
      @click="isUpdateBirthdayShow = true"
    />
1
2
3
4
5
6
# 6.2、封装组件和布局
创建
user-profile/components/update-birthday.vue组件<template> <div class="update-birthday"> <!-- currentDate 双向绑定了日期选择器 设置日期选择器的默认值 同步日期选择器选择的日期 min-date: 可选的最小日期 max-date: 可选的最大日期 --> <van-datetime-picker v-model="currentDate" type="date" :min-date="minDate" :max-date="maxDate" @cancel="$emit('close')" @confirm="onConfirm" /> </div> </template> <script> export default { name: 'UpdateGender', components: {}, props: {}, data () { return { minDate: new Date(1970, 0, 1), maxDate: new Date(), currentDate: new Date() } }, computed: {}, watch: {}, created () {}, mounted () {}, methods: { // 确定事件 onConfirm(){ } } } </script> <style scoped lang="less"> </style>1
2
3
4
5
6
7
8
9
10
11
12
13
14
15
16
17
18
19
20
21
22
23
24
25
26
27
28
29
30
31
32
33
34
35
36
37
38
39
40
41
42
43
44
45
46
47
48父组件
user-profile/index.vue导入,注册,使用 且监听关闭事件import UpdateBirthday from './components/update-birthday'1components: { UpdateBirthday }1
2
3<!-- 编辑生日 --> <van-popup v-model="isUpdateBirthdayShow" position="bottom" > <update-birthday @close="isUpdateBirthdayShow = false" /> </van-popup> <!-- /编辑生日 -->1
2
3
4
5
6
7
8
9
10
# 6.3、数据传递
父组件 传递用户昵称用于显示,且将来子组件内部会更新这个生日,故而可使用
v-model<!-- 编辑生日 --> <van-popup v-model="isUpdateBirthdayShow" position="bottom" > <update-birthday v-if="isUpdateBirthdayShow" v-model="user.birthday" @close="isUpdateBirthdayShow = false" /> </van-popup> <!-- /编辑生日 -->1
2
3
4
5
6
7
8
9
10
11
12子组件定义
props接收props: { // 接收用户生日 value: { type: String, required: true } }1
2
3
4
5
6
7将接收到的数据赋给
data变量(如果直接绑定给输入框则违法了修改props的原则)data () { return { minDate: new Date(1970, 0, 1), maxDate: new Date(), currentDate: new Date(this.value) } },1
2
3
4
5
6
7
# 6.4、发送请求
在
api/user.js里面封装修改资料方法(相同不用封装)/** * 更新用户资料 */ export const updateUserProfile = data => { return request({ method: 'PATCH', url: '/v1_0/user/profile', data }) }1
2
3
4
5
6
7
8
9
10
11导入请求方法,发送请求
import { updateUserProfile } from '@/api/user'
import dayjs from 'dayjs'
1
2async onConfirm () { this.$toast.loading({ message: '保存中...', forbidClick: true, // 禁止背景点击 duration: 0 // 持续展示 }) try { const currentDate = dayjs(this.currentDate).format('YYYY-MM-DD') await updateUserProfile({ birthday: currentDate }) // 更新视图 this.$emit('input', currentDate) // 关闭弹层 this.$emit('close') // 提示成功 this.$toast.success('更新成功') } catch (err) { this.$toast.fail('更新失败') } }1
2
3
4
5
6
7
8
9
10
11
12
13
14
15
16
17
18
19
20
21
22
23
24
25
26
# 7、修改头像
# 7.1、图片预览思路
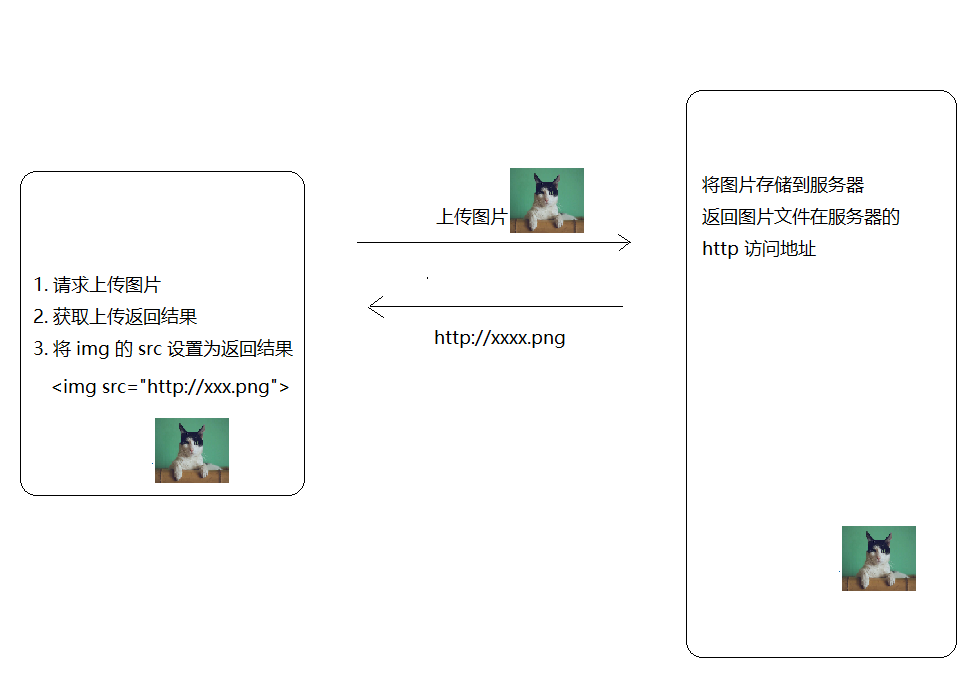
方式一:结合服务器的图片上传预览

方式二:纯客户端实现上传图片预览
// 获取文文件对象
const file = fileInput.files[0]

// 设置图片的 src
img.src = window.URL.createObjectURL(file)
2
3
4
5
客户端上传预览示例:
<!DOCTYPE html>
<html lang="en">
<head>
  <meta charset="UTF-8">
  <title>客户端图片上传预览示例</title>
  <style>
    .img-wrap {
      width: 200px;
      height: 200px;
      border: 1px solid #ccc;
    }

    img {
      max-width: 100%;
    }
  </style>
</head>
<body>
  <h1>客户端图片上传预览示例</h1>
  <div class="img-wrap">
    <img src="" alt="" id="img">
  </div>
  <br>
  <input type="file" id="file" onchange="onFileChange()">
  <script>
    const img = document.querySelector('#img')
    const file = document.querySelector('#file')

    function onFileChange() {
      // 得到 file-input 的文件对象
      const fileObj = file.files[0]
      const data = window.URL.createObjectURL(fileObj)
      img.src = data
    }
  </script>
</body>
</html>
2
3
4
5
6
7
8
9
10
11
12
13
14
15
16
17
18
19
20
21
22
23
24
25
26
27
28
29
30
31
32
33
34
35
36
37
38
接下来就是在项目中使用纯客户端的方式处理用户头像上传预览。
# 7.2、头像裁切思路
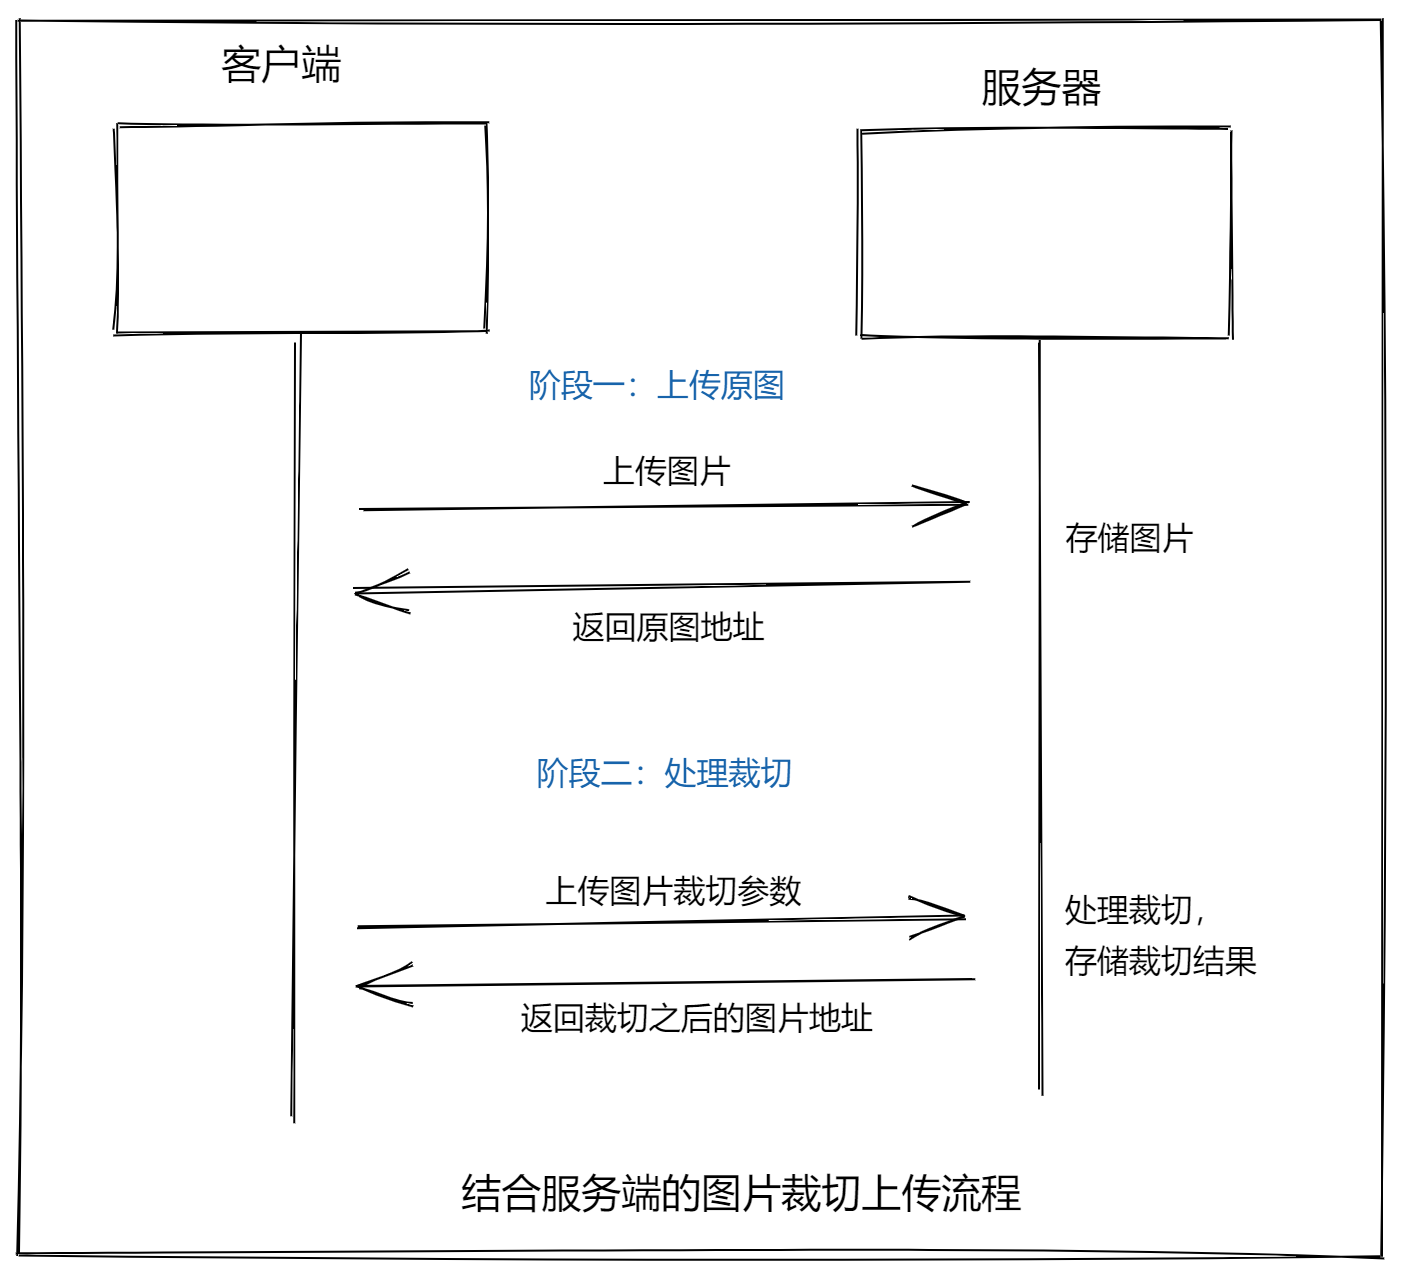
方案一:结合服务端的图片裁切上传流程

方案二:纯客户端的图片裁切上传流程
- <input type="file"> (opens new window)
- 在web应用程序中使用文件 (opens new window)
- 优秀插件: https://github.com/fengyuanchen/cropperjs
# 7.3、实现图片预览功能
- 处理file-input
增加一个文件选择标签,让头像行点击触发文件选择器的点击事件
<input  type="file"  hidden  ref="file" @change="onFileChange" >

<!-- 个人信息 -->
<van-cell
     class="photo-cell"
     title="头像"
     is-link
     center
     @click="$refs.file.click()"
>
    <van-image
       class="avatar"
       fit="cover"
       round
       :src="user.photo"/>
</van-cell>
2
3
4
5
6
7
8
9
10
11
12
13
14
15
16
onFileChange () {
    // 获取文件对象
    const file = this.$refs.file.files[0]

    // 基于文章对象获取 blob 数据
    const data = window.URL.createObjectURL(file)

    console.log(data)
}
2
3
4
5
6
7
8
9
- 功能处理
准备弹出层
<!-- 编辑头像 -->
<van-popup
    v-model="isUpdatePhotoShow"
    position="bottom"
    style="height: 100%;"
>
    编辑头像编辑头像编辑头像
</van-popup>
<!-- /编辑头像 -->
2
3
4
5
6
7
8
9
定义存储头像预览数据变量和弹框控制变量
data () {
 	return{
        // 其他数据...
        isUpdatePhotoShow: false,
        img: null // 预览的图片
    }
}
2
3
4
5
6
7
打开弹框,赋值预览图片地址数据
onFileChange () {
    // 获取文件对象
    const file = this.$refs.file.files[0]

    // 基于文章对象获取 blob 数据
    this.img = window.URL.createObjectURL(file)

    // 展示预览图片弹出层
    this.isUpdatePhotoShow = true

    // file-input 如果选了同一个文件不会触发 change 事件
    // 解决办法就是每次使用完毕,把它的 value 清空
    this.$refs.file.value = ''
}
2
3
4
5
6
7
8
9
10
11
12
13
14
创建user-profile/components/update-photo.vue组件
<template>
  <div class="update-photo">
    <img class="img" :src="img" ref="img">

    <div class="toolbar">
      <div class="cancel" @click="$emit('close')">取消</div>
      <div class="confirm" @click="onConfirm">完成</div>
    </div>
  </div>
</template>

<script>
export default {
  name: 'UpdatePhoto',
  components: {},
  props: {
    // 预览图片地址信息
    img: {
      type: [String, Object],
      required: true
    }
  },
  data () {
    return {}
  },
  computed: {},
  watch: {},
  created () {},
  mounted () {},
  methods: {
      // 确定事件
      onConfirm(){

      }
  }
}
</script>

<style scoped lang="less">
.update-photo {
  background-color: #000;
  height: 100%;
  .toolbar {
    position: fixed;
    left: 0;
    right: 0;
    bottom: 0;
    display: flex;
    justify-content: space-between;
    .cancel, .confirm {
      width: 90px;
      height: 90px;
      font-size: 30px;
      display: flex;
      justify-content: center;
      align-items: center;
      color: #fff;
    }
  }
}
.img {
  display: block;
  max-width: 100%;
}
</style>
2
3
4
5
6
7
8
9
10
11
12
13
14
15
16
17
18
19
20
21
22
23
24
25
26
27
28
29
30
31
32
33
34
35
36
37
38
39
40
41
42
43
44
45
46
47
48
49
50
51
52
53
54
55
56
57
58
59
60
61
62
63
64
65
66
父组件 user-profile/index.vue 导入,注册,使用 且监听关闭事件
import UpdatePhoto from './components/update-photo'
  components: {
    // 其他注册...
    UpdatePhoto
  },
2
3
4
    <!-- 编辑头像 -->
    <van-popup
      v-model="isUpdatePhotoShow"
      position="bottom"
      style="height: 100%;"
    >
      <update-photo
        v-if="isUpdatePhotoShow"
        :img="img"
        @close="isUpdatePhotoShow = false"
      />
    </van-popup>
    <!-- /编辑头像 -->
2
3
4
5
6
7
8
9
10
11
12
13
# 7.4、实现图片裁剪上传
- 使用裁剪组件
安装cropperjs导入使用, 文档地址: https://github.com/fengyuanchen/cropperjs
npm i cropperjs
导入使用,初始化
import 'cropperjs/dist/cropper.css'
import Cropper from 'cropperjs'
2
data () {
    return {
        cropper: null   // 裁剪器对象
    }
}

mounted () {
    const image = this.$refs.img
    this.cropper = new Cropper(image, {
      viewMode: 1,
      dragMode: 'move',
      aspectRatio: 1,
      // autoCropArea: 1,
      cropBoxMovable: false,
      cropBoxResizable: false,
      background: false
    })
    // 不能在这里调用 this.cropper.getCroppedCanvas() 方法!因为裁剪器还没初始化好!
}
2
3
4
5
6
7
8
9
10
11
12
13
14
15
16
17
18
19
注意:
- 要求被裁剪的
img标签元素,必须有个块标签包裹! - 必须在
mounted里面调用,因为这里组件才挂载完成
获取裁剪结果信息
注意,不能在初始化后立即调用获取结果的方法,因为裁剪器初始化是一个异步过程,这里可能存在没有初始化好的情况
onConfirm () {
    // 基于服务端的裁切使用 getData 方法获取裁切参数
    // console.log(this.cropper.getData())

    // 纯客户端的裁切使用 getCroppedCanvas 获取裁切的文件对象
    this.cropper.getCroppedCanvas().toBlob(blob => {
        console.log(blob)  // 裁剪后的结果信息
    })
},
2
3
4
5
6
7
8
9
- 提交头像修改
api/user.js封装头像修改方法
/**
 * 更新用户照片资料
 */
export const updateUserPhoto = data => {
  return request({
    method: 'PATCH',
    url: '/v1_0/user/photo',
    data
  })
}
2
3
4
5
6
7
8
9
10
页面中导入使用,提交头像资料
import { updateUserPhoto } from '@/api/user'
async updateUserPhoto (blob) {
    this.$toast.loading({
        message: '保存中...',
        forbidClick: true, // 禁止背景点击
        duration: 0 // 持续展示
    })
    try {
        // 错误的用法
        // 如果接口要求 Content-Type 是 application/json
        // 则传递普通 JavaScript 对象
        // updateUserPhoto({
        //   photo: blob
        // })

        // 如果接口要求 Content-Type 是 multipart/form-data
        // 则你必须传递 FormData 对象
        const formData = new FormData()
        formData.append('photo', blob)

        const { data } = await updateUserPhoto(formData)

        // 关闭弹出层
        this.$emit('close')

        // 更新视图
        this.$emit('update-photo', data.data.photo)

        // 提示成功
        this.$toast.success('更新成功')
    } catch (err) {
        this.$toast.fail('更新失败')
    }
}
2
3
4
5
6
7
8
9
10
11
12
13
14
15
16
17
18
19
20
21
22
23
24
25
26
27
28
29
30
31
32
33
onConfirm () {
    // 基于服务端的裁切使用 getData 方法获取裁切参数
    // console.log(this.cropper.getData())

    // 纯客户端的裁切使用 getCroppedCanvas 获取裁切的文件对象
    this.cropper.getCroppedCanvas().toBlob(blob => {
        this.updateUserPhoto(blob)
    })
}
2
3
4
5
6
7
8
9
父组件里面监听头像更新事件,修改头像信息
    <!-- 编辑头像 -->
    <van-popup
      v-model="isUpdatePhotoShow"
      position="bottom"
      style="height: 100%;"
    >
      <update-photo
        v-if="isUpdatePhotoShow"
        :img="img"
        @close="isUpdatePhotoShow = false"
        @update-photo="user.photo = $event"
      />
    </van-popup>
    <!-- /编辑头像 -->
2
3
4
5
6
7
8
9
10
11
12
13
14
